Showing posts with label My Favorite Sweets. Show all posts

July 25, 2020

Keto Strawberry Dream Dessert

This is my Keto version of that famous Strawberry Jello Pretzel Salad that I'm sure you have all seen or at least hopefully eaten.  That original version is one of my absolute favorite treats, especially during Summer, but it's not something that works on a low-carb diet.  So, it was time for a low-carb, keto-friendly, version.  The result is THE BEST KETO DESSERT EVER!!!  Seriously, this is DIVINE and approved by the whole family. 

There are several steps to making this dessert, but every single step is well worth it. 
To make it easier for serving, I made them in individual serving cups.  These are very generous servings and are guaranteed to satisfy.  They start with a layer of sugar-free Strawberry Jello on the bottom.  You can always use another flavor if you prefer.  The next layer is a fluffy, sweet and extra creamy whipped cream mixture.  The final layer is the crunchy topping.  You guys . . . this crunchy topping is unbeatable . . . It is salty, a little sweet and super crunchy.  You won't find another crunchy topping better than this.  

When all of these layers are eaten together, it is like a dream, because you can't believe how dang good it is.  
You might also like:
One recipe makes 12 very generous servings.  You might be able to find perfect little plastic lids for your cups, but I went with good old plastic wrap to cover mine.  

Make sure to store them in the refrigerator and they stay fresh up to an entire week.  The strawberries on top were just for garnish on mine, but you can always add fresh fruit to yours, it'll up the carb count though.  With the online nutrition calculator that I used, it calculated about 2.17 net carbs per cup.  Please use your trusted nutrition calculator to calculate all macros.  

You have got to try this dessert whether you are on a low carb diet or not.  It's delicious.

Keto Strawberry Dream Dessert
From: Jenn@eatcakefordinner
(Printable Recipe)

Strawberry Layer:
1 (6 oz.) box sugar-free Strawberry Jello
2 cups boiling water
2 cups ice cold water

Whipped Cream Cheese Layer:
8 oz. cream cheese, softened
3/4 cup granulated Swerve (or similar sweetener), divided
2 tsp. vanilla extract, divided
2 c. heavy whipping cream

Pecan Topping:
2 c. pecans, chopped
1/2 c. almond flour
1/3 c. granulated Swerve (or similar sweetener)
4 Tbl. unsalted butter, melted
1 tsp. kosher salt

Place 12 (9 oz.) plastic cups on a sheet tray (make sure the sheet tray will fit in your fridge); set aside. For the Strawberry Layer:  Add the boiling water to a med-large measuring bowl with a pour spout.  Add the jello powder and whisk until the jello is dissolved.  Stir in the cold water. Allow to sit until lukewarm.  Then, pour evenly into the 12 cups.  Carefully place the cups in the refrigerator and allow to set up.  

For the Whipped Cream Cheese Layer:   In a medium bowl, beat cream cheese, 1/2 cup of the Swerve and 1 teaspoon of vanilla extract until smooth and creamy; set aside.  In the bowl of a stand mixer, add the whipping cream and whip until frothy, then add 1 teaspoon of vanilla extract and gradually add the remaining 1/4 cup of Swerve.  Turn up the speed and beat until thick and fluffy.  Add the cream cheese mixture to the whipped cream and mix until combined, making sure to scrape the bowl once or twice.  Spoon evenly into cups over set up jello layer. Refrigerate.

For the Pecan Topping:  Preheat oven to 350 degrees.  In a medium bowl, combine the chopped pecans, almond flour, Swerve and kosher salt.  Add the melted butter and toss together with a fork until everything is coated in butter.  Pour into a lightly greased 8x8 glass baking dish and press down evenly.  Bake for 10-11 minutes or until toasted.  Remove from oven and allow to cool completely.  Once cool, break into chunks and cover each cup with topping.  It might seem like a lot of crunchy topping, but it's perfect.  Serve right away or cover each cup with plastic wrap and refrigerate until ready to serve.  These stay fresh up to a week.  

Recipe adapted from an Instagram Story I saw on hannah_nos_carbs

Note: Eat Cake For Dinner does not provide nutritional facts.  If you would like to know the macros on this recipe, please use an online nutrition calculator.

April 5, 2020

Orange Dreamsicle Cookies

mmm . . . mmm . . .mmm . . . 

These are one of my favorite cookies.  I have been making these cookies for around ten years now and they are always a huge hit.  

They are a perfect year round cookie.  
The cookie is chewy and moist with a hint of freshness from the orange zest and a sweet, melt-in-your mouth feeling from the white chocolate chips.  There is just something about orange and white chocolate together that is irresistible. 

You might also like:

Orange Dreamsicle Cookies

2 1/4 c. all-purpose flour
3/4 tsp. baking soda
1/2 tsp. salt
1 c. (2 sticks) unsalted butter, room temperature
1/2 c. sugar
1/2 c. light brown sugar
1 egg
1 tsp. vanilla
1 1/2 - 2 Tbl. grated orange zest 
1 1/2 c. white chocolate chips

Preheat oven to 350 degrees.  Combine flour, baking soda and salt; set aside.  In a large bowl, cream together the butter and both sugars until light and fluffy.  Add the egg, vanilla and orange zest and mix until combined.  Gradually add the flour mixture and beat until combined.  Stir in the white chocolate chips.  Using a small ice cream scoop, drop dough onto a lightly greased cookie sheet.  Bake for 10 minutes.  Makes around 2 1/2 - 3 dozen cookies. 


October 17, 2018

Peanut Butter M&M Cookie Bars

These cookie bars are SOOOO good.  This recipe is my go-to cookie bar recipe that I use all of the time, but I switched things up this time and added Peanut Butter M&M's. 

I think this might have been the first time I have bought Peanut Butter M&M's and it definitely won't be the last. They made these cookie bars outstanding.  The cookie is soft and chewy and then when you bite into the M&M's with the crisp outer shell and creamy peanut butter filling, you will be in heaven.  These come together super fast and taste great for several days.

You might also like:


Peanut Butter M&M Cookie Bars
From: Jenn@eatcakefordinner

3/4 c. unsalted butter, room temperature
2 c. packed light brown sugar
3 large eggs
2 tsp. vanilla extract
3 1/2 c. all-purpose flour
1 Tbl. baking powder
1/2 tsp. salt
1 (18.4oz.) bag Peanut Butter M&M's

Preheat oven to 350 degrees.  Cream together the butter and brown sugar.  Add the eggs, one at a time, beating after each addition.  Add the vanilla and mix until combined.  Add the flour, baking powder and salt and mix until just combined.  Stir in the Peanut Butter M&M's.  Press dough into a greased 9x13-inch cake pan.  Bake for 20 minutes.  Cool, cut into bars and serve.  

July 6, 2018

My Go-To Banana Cake with Cream Cheese Frosting


This is my go-to banana cake recipe.  I have been making it for several years and I always get recipe requests for this.  Sometimes I switch up the frosting.  I've tried vanilla buttercream, cream cheese frosting, Nutella frosting and all are fabulous.  I've been a bit obsessed with cream cheese frosting lately.  That tang from the cream cheese just hits the spot :)

Next time you have some brown bananas lying around, you have got to try this.  The cake is dense and loaded with flavor.  Top it with whatever frosting you prefer and you might just find yourself buying bananas and letting them go brown on purpose, so you can make this sweet dessert.

You might also like:

Banana Cake with Cream Cheese Frosting
(Printable Recipe)

2 Tbl. unsalted butter, softened
2/3 c. sugar
1 large egg
1/2 c. non-fat plain Greek yogurt
1 tsp. vanilla extract
2 ripe bananas, mashed (about 3/4 cup)
1 c. all-purpose flour
1/4 tsp. salt
1/2 tsp. baking soda

Cream Cheese Frosting
4 Tbl. unsalted butter, softened
4 oz. cream cheese, room temperature
pinch of salt
1 1/2 tsp. vanilla extract (or 1 Tbl. vanilla bean paste)
1 1/2 c. powdered sugar
milk, enough to reach desired consistency

Preheat oven to 375 degrees.  For the cake: Cream together butter and sugar until fluffy.  Add the egg and mix to combine.  Add the yogurt and vanilla and mix well.  Mix in the mashed banana.  Add the flour, salt, baking soda and stir together just until combined.  Pour into a greased 8x8-inch baking dish.  Bake for 25 minutes or until the top springs back when lightly touched or a toothpick inserted in the center comes out clean.  Cool completely and frost.  Store leftover cake in the refrigerator. 

For the frosting: Beat butter and cream cheese until fluffy.  Add a pinch of salt and the vanilla and mix until blended.  Add one cup of powdered sugar and mix until combined.  Add remaining powdered sugar and enough milk, as needed, to reach desired spreading consistency.  Beat until smooth and fluffy and spread over cooled cake.  

Base cake recipe adapted from: Butter Yum 
Frosting from: Jenn@eatcakefordinner

April 7, 2018

Andes Mint Brownies


Hi, how is everyone doing?  Life has been so crazy lately and I haven't been posting as much.  Not sure if that will change anytime soon, but I'll try to post as much as possible.   

This recipe is back from 2011 and these brownies are still a family favorite. It was long overdue to re-share them with all of you.  

If you like Andes Mints then you will LOVE these brownies.  They are a chewy brownie with a layer of mints in the middle.  I have made them so many times and they come out perfect every time.  I love biting into the soft brownie and getting a snap from the mints.  The flavor is rich and minty and very refreshing.  

You might want to plan on sharing these with friends and neighbors or you will be very tempted to eat the entire pan by yourself.  
Andes Mint Brownies
adapted from: Paula Deen
(Printable Recipe)


1 1/2 c. unsalted butter, melted
1 c. unsweetened cocoa powder
3 c. sugar
4 large eggs
2 c. all-purpose flour
1/2 tsp. salt
1 tsp. vanilla
3 boxes Andes Mints (individually wrapped)


Preheat oven to 350 degrees.  Grease 9x13 pan.  In a medium bowl, combine melted butter and cocoa, stirring well; set aside.  In a large bowl, beat sugar and eggs at medium speed until fluffy, about 5 minutes.  Slowly beat in butter mixture. Add flour, salt and vanilla beating just until combined.  Spread half of the batter in pan.  Unwrap each mint and place, side by side, covering batter completely.  Carefully spread remaining batter over mints, sealing to edges.  Bake for 35 minutes.  Let cool in pan completely.  

February 17, 2018

Nutella No Bake Cookies

This recipe is back from 2012.  I decided it was overdue for some updated pics and since I make these all the time, I wanted to re-share them with all of you.

Here is my original post:
No Bake Cookies are one of those cookies that I could eat EVERY SINGLE DAY.  I have been eating them as long as I can remember and I still have never gotten sick of them.  The funny thing is, that I had been craving no-bakes for the past few weeks, but I never made them, because I thought - no one wants to see the same old no bake recipe.  Then, last night I found NUTELLA NO BAKE COOKIES.  For real!!!
What a fun twist on an old classic.  I crossed my fingers that I still had enough Nutella left in the jar - oh and I did, but only for a half a batch.  But hey, better than nothing.  They turned out delicious.  So creamy and chewy just how I like them.  We ate these things so fast and I only have one left.  These are super yummy.


Nutella No Bake Cookies
adapted from: Shugary Sweets
2 c. sugar
1/4 c. unsweetened cocoa powder
1/2 c. milk
1/2 c. butter
1 tsp. vanilla
pinch of salt
1/4 c. creamy peanut butter
1/4 c. Nutella
3 c. quick-cooking oats

In a medium saucepan, combine the sugar, cocoa powder, milk and butter.  Cook over medium heat, stirring until the butter is melted and sugar is dissolved.  Bring to a boil.  Remove from heat and stir in the vanilla, salt, peanut butter and Nutella.  Last, stir in the oats and quickly drop by spoonfuls onto wax paper.  Allow to harden and enjoy. 

January 20, 2018

BEST EVER White Chocolate Popcorn

I originally posted this recipe back in 2011 and it is still one of my family's favorite treats, so it was time to update the pics and share with all of you again.

The flavor of this really is amazing thanks to the type of popcorn the recipe calls for.  It's also so easy to customize for each holiday by switching out the M&M's you use.  

Check out my original post down below.  
If I would have seen this recipe on a blog, I probably would have just passed by it, but lucky for you, my boss makes it for us every year for Christmas, so I know how amazing it is.

I was making this a few days ago when Jake comes into the kitchen and says:

"Ewe, why did you use buttered popcorn?"

I said "Don't knock it until you try it."

So . . . he takes a bite . . . takes another bite . . . gets out a bowl and fills it up . . . finishes the bowl and says . . .  

"What is this stuff?  Why is it so good and why can't I stop eating it?"
So, there you have it.  This stuff is seriously AMAZING AND ADDICTING!  Neither of us have been able to stop eating it for the past three days.  I know it sounds strange, but it works.  

STOP whatever you are doing . . . Get up . . . Get dressed . . . go to the store and get some buttered popcorn, white chocolate candy melts and some M&M's and MAKE THIS RIGHT NOW. 


BEST EVER White Chocolate Popcorn
adapted from: Diana J.

3 bags (regular-size) Extra Butter Microwave Popcorn
1 1/2 (12 oz.) bags Wilton White Candy Melts
    or 1 Lb. White Chocolate Almond Bark
1 (11.4 oz.) bag regular M&M's or 1/2 bag mini M&M's

Pop popcorn in the microwave, DO NOT BURN IT.  Transfer to a really large bowl, making sure to get out all of the un-popped kernels so no one breaks their teeth.  Melt white candy melts according to package directions.  Pour over popped popcorn and add M&M's.  Stir until all of the popcorn is coated with chocolate.  Let set until chocolate has hardened.  When chocolate has hardened, the popcorn will be stuck together in one large ball.  So, use a spoon to break it into chunks.  Store in an air-tight container.  Serve.  

Jenn's Notes: You can find the Wilton White Candy Melts in the craft section at Walmart or at Craft Stores (Hobby Lobby or Michael's).  This popcorn is a great neighbor gift. Add to cute cellophane bags and tie with a ribbon.  If you burn the popcorn, don't think the white chocolate will hide the burnt taste, because it won't.  If you burn it, throw it out and use a different bag.   

June 17, 2017

Rocky Road Brownies

I originally posted this recipe back in 2012 and I have now been making these brownies for 10 or 11 years.  They are seriously one of MY FAVORITE BROWNIES EVER.  The brownie is so soft and chewy, the marshmallow layer is sticky and amazing and the chocolate icing is rich and creamy.  The edges are my favorite.

Here is my original post from 2012 . . . 

This brownie recipe was one of the first recipes that got me into baking (5 or 6 years ago).  One of my co-workers, Liz, would make these every once in a while and bring them to work for us to munch on.  They were one of the best brownies I had ever eaten.  I was used to store-bought brownies and box mix brownies and had never tried a "from scratch" version.  I was so impressed that a young woman (like myself at the time) could create such a yummy treat.  I was used to Mom's and Grandma's making treats, not young women.  I guess you could say that's what started it all - my foodie obsession!

I started making these weekly, then monthly, then here and there.  Eventually, I kind of forgot about them and moved onto other recipes.  Well, at work the other day, the same day I had chili cheese potatoes, I also had a marshmallow brownie for dessert.  It was chewy, gooey, very rich and was topped with a creamy frosting. 
I just couldn't get over how good they were and I had to find out who made them and get the recipe.  I got the recipe and couldn't wait to make them as soon as I got home.  I decided to check the recipe to Liz's.  It was the exact same recipe, no wonder I LOVED these brownies so much.  I hadn't made them for a few years and had forgotten what was in them.  It reminded me how much I loved them.  The only difference was Liz makes homemade frosting and the ones from work had store-bought frosting.  Whichever you prefer, they will be AMAZING.

If you have never tried a brownie recipe from scratch, let this be the first one.
  
Rocky Road Brownies
adapted from: Liz M.
(Printable Recipe)

1 c. unsalted butter, melted
2 c. sugar
1/3 c. unsweetened cocoa powder
2 tsp. vanilla        
1 tsp. salt
4 large eggs
chopped walnuts or pecans, opt.
1 1/2 c. all-purpose flour
1 (10 oz.) bag mini marshmallows

Icing:
1/2 c. unsalted butter, softened
1/4 c. unsweetened cocoa powder
1/4 c. evaporated milk, more or less
1 tsp. vanilla
3 c. powdered sugar

or

1 container store-bought milk chocolate frosting

Preheat oven to 350 degrees.  Combine melted butter, sugar and cocoa powder. Add the vanilla, salt, eggs and nuts.  Last, stir in the flour.  Whisk together until completely smooth and well combined.  You can either use a hand mixer or a whisk for this.  Pour into a lightly greased 9x13 pan and bake for 25 minutes.  Remove from oven and top with the marshmallows.  Return to oven and bake for 5 minutes or until marshmallows are puffed up.  Allow to cool and then  spread homemade icing or store-bought frosting over the top.  


To make the icing:  Using a hand mixer, beat butter until fluffy.  Add the cocoa powder and vanilla and mix until well combined.  Gradually add the powdered sugar and mix until smooth and creamy, adding evaporated milk as you go to reach desired consistency.       


SaveSave

April 15, 2017

Honeybun Cake

I originally shared this recipe with you back in 2011 and since it is still one of our favorites, I thought it deserved a re-share.  Here is the original post . . .

My mom gave me this recipe quite awhile ago and I put it aside and didn't think much about it.  After she had given it to me, I remember her talking about it several times and that she was making it AGAIN.  I didn't understand why they liked it so much, because it didn't sound that special to me.  Then, one afternoon, we were over at her house having lunch or a BBQ or something?  I honestly don't even remember what we were eating?  However, she had this Honeybun Cake for dessert.  I remember tasting it and I think my jaw might have dropped to the floor?  OMG - WHY DIDN'T YOU TELL ME THIS CAKE WAS SO GOOD????  

Now, I love anything with cinnamon.  I love cinnamon so much that I buy it in the bulk section.  This cake reminds me of a CINNAMON ROLL, but in cake form.  You have a super moist cake, swirled with cinnamon and sugar and a gooey glaze on top.  It is amazing warm, right out of the oven and it is amazing at room temperature. 
When I make this for myself, I cut the recipe in half.  That is when my kitchen scale comes in handy.  I just measure my cake mix, use half and save the other half for next time I am craving this cake.  Turns out perfect every time.   

Everyone that I have made this for has declared it one of their new favorites! You should make this for your family tomorrow for Easter.  It would be perfect for breakfast, brunch or dessert.

You might also like:
Cinnamon Roll Quick Bread
Amish Friendship Cinnamon Bread (Without a Starter)
Peach Pie Sheet Cake Bars
Carrot Cake Bars with Cream Cheese Frosting

Honeybun Cake
adapted from: Sharon H. 

1 (15.25 oz.) box yellow cake mix
4 large eggs
1 c. sour cream
3/4 c. canola or vegetable oil
1 c. light brown sugar, packed
2 tsp. cinnamon

For the Glaze:
2 c. powdered sugar
1-2 Tbl. milk
2 tsp. vanilla

Preheat oven to 325 degrees.  Combine cake mix, eggs, sour cream and oil until well blended; set aside.  Combine brown sugar and cinnamon in a separate bowl.  Spread half of the cake batter into a lightly greased 9x13-inch cake pan.  Sprinkle with half of the brown sugar and cinnamon, covering the entire cake.  Spread the rest of the cake batter over layer and top with remaining sugar and cinnamon.  Use a knife and swirl the batter.  

Bake for around 45 minutes or until a toothpick comes out clean.  Make the glaze: combine powdered sugar, milk and vanilla until smooth and pour over the hot cake right when it comes out of the oven.  Let set.  Serve warm or at room temperature.  You could add 1/3 cup of chopped pecans to the brown sugar and cinnamon mixture if you would like.  


Linked up at Weekend Potluck!

SaveSave

March 26, 2017

Mom's Coconut Almond Chex Mix {Best Ever}


My Mom has been making this chex mix for as long as I can remember.  She usually only made it a few times a year, but one of those times was always on New Year's Eve.  It makes a ton, so it's great to take to a party.  

Friday night, I got home from work, put on my comfortable clothes and was ready to relax for the night, when my hubby really really wanted some of this chex mix.  So, we headed to the store to buy the cereal.  I usually have most of the other ingredients on hand.

By the way, what is up with cereal?  The boxes are getting smaller and the prices are getting higher, same thing that I complain about with chips.  What they call "Party-Size" is pretty much what regular-size used to be.  Anyway, my Mom's recipe calls for a 1/2 a box of golden grahams, but since cereal box sizes are completely different than they used to be, we had to decide how much was the perfect amount.
Within a few minutes of getting home from the store, we had a big bowl of this super addicting, BEST EVER, chex mix finished and ready to eat.  When I say it's addicting, it totally is.  Once you start eating it, it's so hard to stop.  The flavor and texture are so satisfying.  Everything you want in texture, is in this chex mix . . . crunchy, creamy and chewy all at the same time.  This is guaranteed to become a family favorite.  

You might also like:

Mom's Coconut Almond Chex Mix
From: Mom
(Printable Recipe)

4 c. Corn Chex Cereal
4 c. Rice Chex Cereal
4 c. Golden Grahams Cereal
1 c. slivered almonds
2 c. sweetened coconut
3/4 c. unsalted butter
1 c. light Karo syrup
1 c. sugar

In a very large bowl (at least 32-cup size), toss together the Corn Chex, Rice Chex, Golden Grahams, slivered almonds and coconut; set aside.  In a medium saucepan, melt the butter.  Add the Karo syrup and sugar and stir until combined.  Heat over medium heat and bring to a boil, then boil for two minutes, stirring constantly.  Remove from heat and immediately pour over the ingredients in the bowl.  Carefully stir together until everything is evenly coated.  Allow to cool and serve.  


SaveSaveSaveSaveSaveSaveSaveSave

February 12, 2017

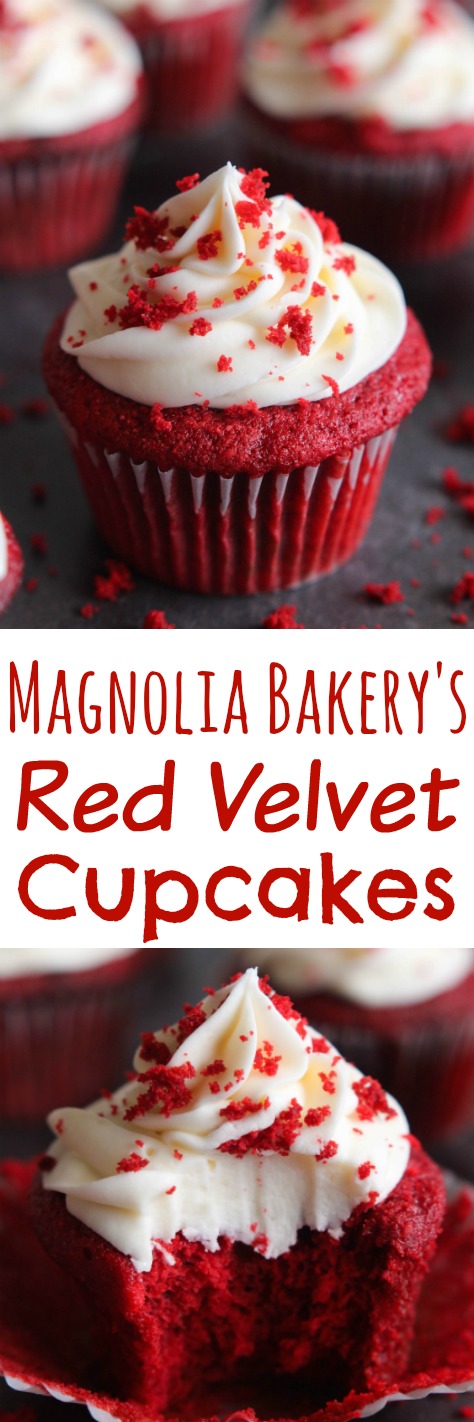
The BEST Red Velvet Cupcakes with Cream Cheese Frosting

I'm so excited to finally be sharing one of my absolute favorite cupcake recipes with you.

When I was young, I had never heard of, or seen, a red velvet cupcake.  It wasn't until I was an adult when I first discovered red velvet cake.  Honestly, I think I first saw a red velvet cake on an episode of Paula Deen on T.V. and I had to try this interesting cake right away.

From the moment I first tasted red velvet cake, it instantly became my favorite and is still, to this day, my favorite flavor of cake.
There was a time when I was making a new red velvet cake recipe every weekend. I had to make up for lost time, right?  I tried recipe after recipe and none compared to this one.  It is a light cake with a beautiful red color and a slight chocolate flavor with a little tang from the buttermilk.  Red velvet cake is not meant to have a super strong chocolate flavor.    

I top these cupcakes with my go-to cream cheese frosting recipe.  I prefer my cream cheese frosting to have more butter than cream cheese, but if you like a super strong cream cheese flavor, you can double the cream cheese and cut the amount of butter called for in half.  

This has been my go-to red velvet cupcake recipe for years and years and I'm sure it will become your favorite too.  

You might also like:

The BEST Red Velvet Cupcakes
adapted from: Magnolia Bakery
(Printable Recipe)

3 1/3 c. cake flour (not self-rising)
3/4 c. (12 Tbl.) unsalted butter, room temperature
2 1/4 c. sugar
3 large eggs, room temperature
2 Tbl. liquid red food coloring
3 Tbl. unsweetened cocoa powder
1 1/2 tsp. vanilla extract
1 1/2 tsp. salt
1 1/2 c. buttermilk
1 1/2 tsp. white vinegar
1 1/2 tsp. baking soda

Preheat oven to 350 degrees.  Line a muffin tin with paper liners and spray with cooking spray; set aside.  In the bowl of a stand mixer, combine butter and sugar and mix on medium speed until very light and fluffy, about 5 minutes.  Add the eggs, one at a time, beating well after each addition.  In a small bowl, whisk the food coloring, cocoa powder and vanilla together; add to the butter/sugar mixture and mix well.  Stir the salt into the buttermilk and add to the batter in three parts, alternating with the cake flour, starting and ending with flour.  In a small bowl, stir together the vinegar and baking soda; add to the batter and mix well.

Fill cupcake liners 2/3 full with batter and bake in preheated oven for 17-18 minutes or until a toothpick inserted in the center comes out clean.  Do not over bake.  Repeat with remaining cupcakes.  Cool completely and top with Cream Cheese Frosting.  Makes about 3 1/2 dozen cupcakes.

Cream Cheese Frosting:
From: Jenn@eatcakefordinner
1 c. (2 sticks) unsalted butter, room temperature
1 (8 oz.) pkg. cream cheese, room temperature
1/4 tsp. salt
2 tsp. vanilla extract
4 1/2 c. powdered sugar
1 Tbl. milk, plus more if needed

In a large bowl, mix together butter, cream cheese, salt and vanilla until smooth.  Add powdered sugar, one cup at a time, beating well after each addition.  If frosting is too thick, add a little milk.  If you are planning to pipe the frosting onto the cupcakes, you want it thick enough to hold its shape.  This makes enough frosting to pipe a big swirl on the top of each cupcake.  I used a Wilton 1M piping tip.

*If you do not want to pipe a large swirl onto each cupcake and prefer to spread a small layer on top instead, the amount of frosting could be cut in half.  


SaveSaveSaveSave
SaveSave

LinkWithin